4D Gaussian Splatting
A Practical Exploration and Workflow Guide
Written by Aimone Bodini, R&D Engineer

From the moment I put on a VR headset and experienced 4D Gaussian Splatting firsthand, I was blown away. The visual fidelity was astonishing, and the way it handled notoriously difficult elements—like hair, transparency, and reflections—left me in awe. That experience set me on a journey to understand and replicate these results, as 4D Gaussian Splatting is proving to be a powerful alternative when traditional reconstruction methods fall short.
About this workflow guide
We’ll use 4D Gaussian Splatting throughout this article and I'll briefly explain why.
This is a technical guide to help you generate 4D Gaussian Splatting using off-the-shelf software and open-source code. Yes, I know, there’s ongoing debate about whether to call these captures Dynamic 3D Gaussian Splatting or 4D Gaussian Splatting, but what truly matters is that they are animated, not static. In this article, I’ll be using the term 4D Gaussian Splatting.
While my hardware setup includes a 4DViews Holosys 48-camera rig (not exactly 'off-the-shelf'), this workflow is camera-agnostic and should be adaptable for smaller setups as well. I’d love to see what you create!
Technical Specifications
Cameras
Model FLIR A38/A68
Resolution: 4MP
FPS: 60
Lens: HF12XA-5M
Quantity: 48
Cameras Array Layout: 360 degrees
Software Versions
RealityCapture: v 1.5.1
PostShot: v 0.5.115
Batch Trainer: v. 2.1
Machine Used
OS: Windows 10
GPU: Nvidia RTX A6000
RAM: 224 GB
CPU: Intel(R) Xeon(R) Gold 6250 CPU 3.90 GHz
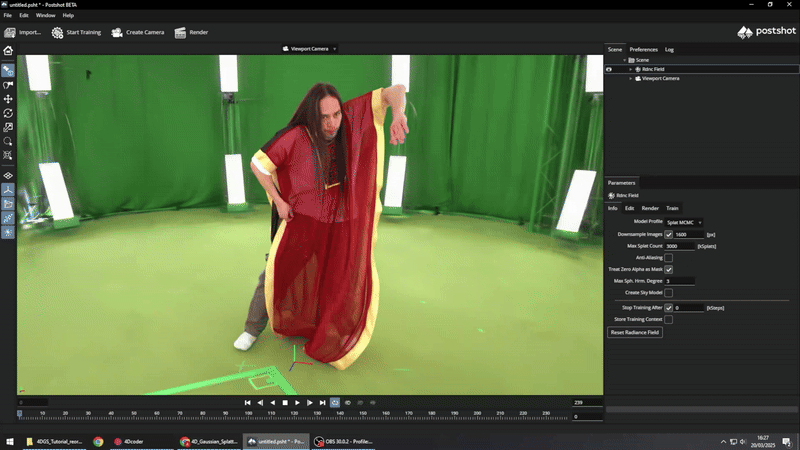
PostShot Settings
Max Splat Count: 2200k
Iterations: 15k
Mode: MCMC
Output: .psht
PostShot Results
Single Frame file size (Background + Subject) 130-140MB
Single Frame file size ( Subject) 19MB
Number of splats (Background + Subject) 572
Number of splats (Subject) 72k
Key Principles
Before jumping into the workflow, it's crucial to highlight three essential elements:
-
Naming – Correct naming conventions are key for file consistency and avoiding errors later on.
-
Metadata – Consistent metadata ensures smooth animation transitions during GS playback.
-
Automation – Given the thousands of files and hundreds of folders involved, manual organisation is impractical.
Step 1: Capture Process and Image Sequence Conversion
If you are capturing in a featureless environment, such as an empty monochromatic space like I did, print and place AprilTags/markers (~50) on the floor and curtains to help RealityCapture (RC) estimate camera positions later.
I learned this after struggling to get a good camera estimation and having to add manual control points in RC.

Capture your performer using the camera rig (ensuring cameras are genlocked).

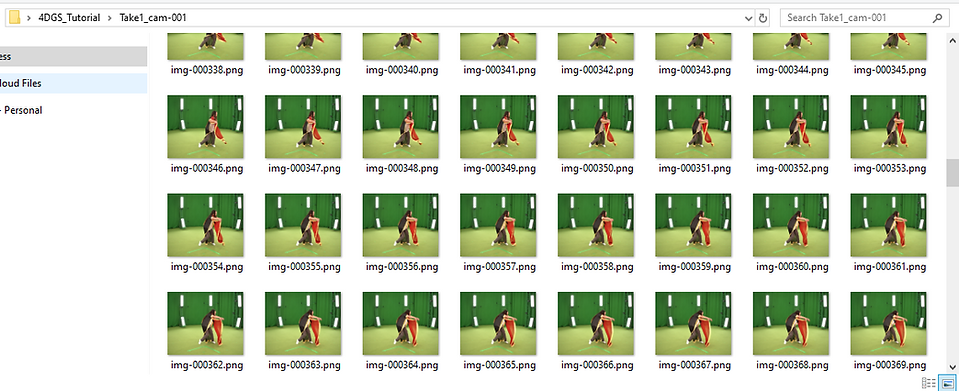
Convert your captured videos into PNG/JPG sequences. Use Terminal or software like Adobe Premiere Pro.
Command Terminal Example:
ffmpeg -i input_video.mp4 -q:v 2 output_folder/frame_%04d.png
Tip: This step really depends on how you typically back up and transfer your raw data from the camera rig, feel free to identify your best method.
Step 2: Naming and Organisation
Folder Structure (my example)
-
Main folder: 4DGS_Tutorial
-
Inside: 48 camera folders (e.g., Take1_cam-001, Take1_cam-002, etc.)
-
Each folder contains image sequences (e.g., img-0001.png, img-0002.png, etc.)

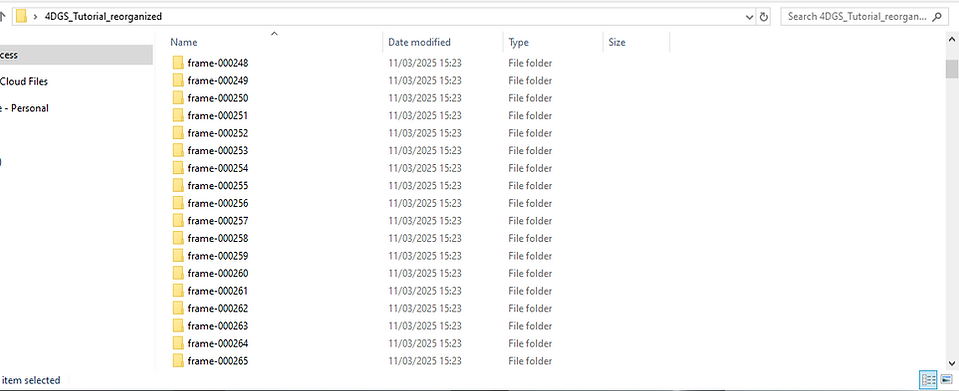
Goal
Reorganise the data so that each folder represents a frame, containing all 48 camera angles.
To do so you can edit the source folder directory and run the Python script below.
Python Script for Data Organisation:
import os
import shutil
# Define source folder
source_folder = r"C:\Users\INTEL-MEGA\Desktop\4DGS_Tutorial"
# Create destination folder on the desktop with "_reorganized" suffix
desktop_path = os.path.join(os.path.expanduser('~'), 'Desktop')
source_folder_name = os.path.basename(source_folder)
destination_folder = os.path.join(desktop_path, f"{source_folder_name}_reorganized")
# Create destination folder if it doesn't exist
os.makedirs(destination_folder, exist_ok=True)
# Get all camera folders
camera_folders = [f for f in os.listdir(source_folder) if os.path.isdir(os.path.join(source_folder, f))]
# Dictionary to track image counts per frame
frame_counters = {}
# Iterate over each camera folder
for cam_folder in camera_folders:
cam_path = os.path.join(source_folder, cam_folder)
# List all images in the camera folder
images = sorted(os.listdir(cam_path)) # Sorting ensures correct frame order
for img in images:
frame_number = img.split('-')[-1].split('.')[0] # Extract frame index
# Define the new folder for this frame
frame_folder = os.path.join(destination_folder, f"frame-{frame_number}")
os.makedirs(frame_folder, exist_ok=True)
# Ensure a counter exists for this frame
if frame_number not in frame_counters:
frame_counters[frame_number] = 1
# Format new filename as img.0001.png, img.0002.png, etc.
new_filename = f"img.{frame_counters[frame_number]:04d}.png"
frame_counters[frame_number] += 1
# Copy (or move) the image to the new folder
src_path = os.path.join(cam_path, img)
dest_path = os.path.join(frame_folder, new_filename)
shutil.copy2(src_path, dest_path) # Use shutil.move() to move instead of copy
print("Reorganization complete!")
Important Note:
This script creates a new folder with the reorganised data, leaving the original folder unchanged. Be aware that this will require additional storage equal to the size of the original folder. If storage is limited, consider modifying the script to reorganise the original folder directly.
I chose to use double the required storage so that I can always revert to the original folder structure if changes are needed.

Step 3: Create Consistent Metadata with RealityCapture
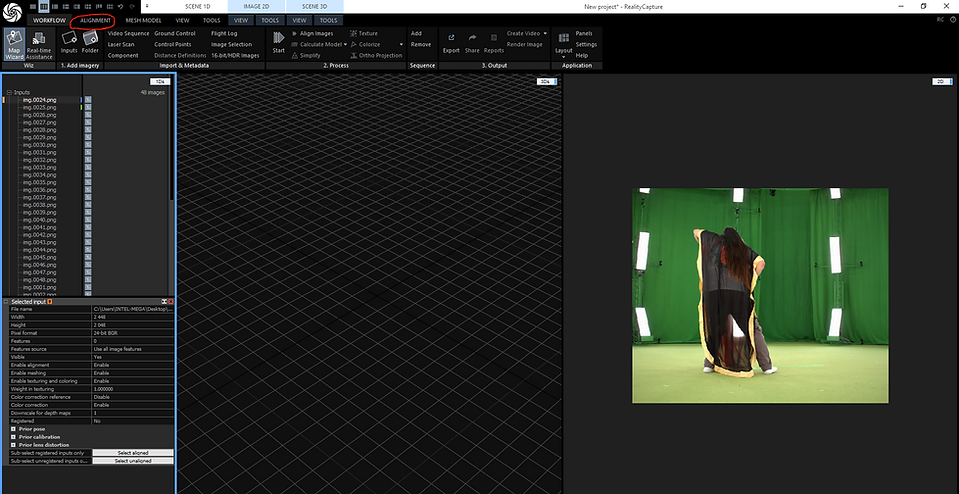
Now, you need to download the Epic Games Launcher and then install RealityCapture.
Import your first frame (e.g., 48 images) into RealityCapture.
-
Attempt Automatic Alignment.

-
In my case I was aiming for 40+ successfully aligned cameras for optimal results.
-
If alignment struggles, try:
- Merging Components
- Manually Adding Control Points
- Placing additional AprilTags/markers
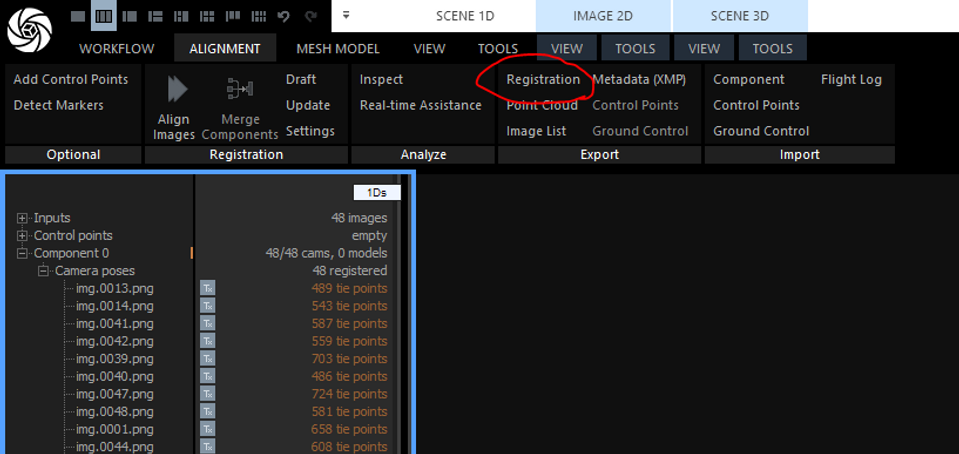
Export Metadata:
Click Registration to export a .csv file with camera extrinsics.

Example .csv File Format:
-
#name,x,y,alt,heading,pitch,roll,f,px,py,k1,k2,k3,k4,t1,t2
-
img.0001.png,5.179648894559619e-002,-39.80990395241096,15.91834636916446,1.100088999795193,80.18058823563678,1.956483594560274,52.68415097664854,-7.41933197404618e-003,-3.408960824228185e-003,-0.2419363617080955,0.594494096541866,-1.765660073881419,0,0,0
-
img.0010.png,-34.70926153034772,-14.78211818641048,16.37025018215018,70.35433106527788,79.17744503334872,-1.378448685817513,52.96772120872687,-1.820156347092069e-002,1.853633664891854e-002,-0.2610495318597385,-0.2443625389229402,4.12868501391975,0,0,0
-
...
Important: The img.xxxx.png file names must match exactly with the corresponding image files in the folder. This is why running the “Python Script for Data Organization” script is crucial, it ensures the correct naming convention for consistency.
-
Click Point Cloud and export a .ply file.
-
In the Point Cloud Export Settings, set ascii = False for PostShot compatibility.


Step 4: Automating Data Organisation
To avoid manually copying and pasting the .csv and .ply files into all frame folders, automate the process by running this second script. Be sure to edit the directory paths according to your needs.
import os
import shutil
# Define source files
csv_file = r"C:\Users\INTEL-MEGA\Desktop\Registration.csv"
ply_file = r"C:\Users\INTEL-MEGA\Desktop\PointCloud.ply"
# Define destination parent folder
target_folder = r"C:\Users\INTEL-MEGA\Desktop\4DGS_Tutorial_reorganized"
# Ensure the source files exist
if not os.path.exists(csv_file) or not os.path.exists(ply_file):
print("Error: One or both source files are missing.")
exit()
# Get all frame folders
frame_folders = [f for f in os.listdir(target_folder) if f.startswith("frame-") and os.path.isdir(os.path.join(target_folder, f))]
# Copy the files into each frame folder
for frame_folder in frame_folders:
frame_path = os.path.join(target_folder, frame_folder)
shutil.copy2(csv_file, frame_path)
shutil.copy2(ply_file, frame_path)
print("Files copied to all frame folders successfully!")

Step 5: Processing with PostShot Batch Trainer
The goal now is to automate the processing of multiple 3D Gaussian Splatting (3DGS) files instead of handling them manually in PostShot one by one.
-
Download PostShot Batch Trainer v2.1 (Credits to Otto Huttunen)
-
Open the tool and select your main folder (e.g., /4DGS_Tutorial_reorganized).
-
Adjust settings like:
-Iterations (Higher values improve quality but increase file size)
-Max Splats per Frame (Balances quality and performance)
Tip: Begin with a small test batch and adjust settings if needed.

Step 6: Finalising in PostShot
-
Open PostShot and drag your folder with the .psht files in it into the interface.
-
PostShot will render the sequence as a 4D GS playback.

-
Performance Tip: Large .psht files may struggle in playback. Lower iteration counts and splat limits may improve performance.
Best Practices & Troubleshooting
-
Use AprilTags or distinct markers for improved RealityCapture alignment.
-
Double-check folder structures before running scripts to avoid errors.
-
In PostShot, deleting excess splats (e.g., background elements) can significantly reduce file size and improve performance. It can be done manually or even better, with the cropping tool. In my experiments, getting rid of the background and only keeping the subject/performer, can reduce the file size of the single 3D GS to 1/9 the initial size.
Some more experiments
The capture to the right is not a 4DGS but a 3D GS example, as I encountered challenges with accurate camera estimation in RealityCapture. However, it’s an interesting demonstration of how the subject’s hair receives varying backlighting (red, blue, white) depending on the angle from which you observe it.
The capture at the bottom is a 4DGS experiment involving transparent objects. While it may appear blurry as a GIF, the result was intriguing. Far from perfect, but still credible from a distance.


In this 4DGS, I experimented with transparent objects and although it may appear blurry as a GIF, the result was intriguing. Far from perfect, but still credible from a distance.
Future Work
As I said at the beginning, I’d be happy to see others experimenting and advancing the workflow to get better results and strategies.
These are some further experiments and tests that need to be done.
-
Reducing flickering between GS frames.
-
Optimising splat count for improved performance.
-
Exploring alternative camera layouts and setups.
-
Investigating potential automation tools for splat reduction.
-
Play with relighting and other VFX/CG traditional techniques.
-
Importing and playback on different platforms and XR devices.

Acknowledgements
Thank you to Alessio Regalbuto for his article which provides a rich introduction with examples and visual materials.
Also to the Gaussian Splatting community for the support throughout this journey.
Credits:
Dancer: Kenji Matsunaga for Birdgang Ltd.
Director: Kendra Horsburgh
Disclaimer: This is my personal workflow. I'm sure there are better ways to approach this, and I welcome feedback and suggestions.
